Table of Contents
Oh! Did our awesome Google Crawler get you landed on this article directly? Not a problem! For a better understanding of this article, you can go through our first part!
In the previous article, we saw how we can integrate Email Authentication using Firebase Auth into our Flutter app. But, it's not over yet! In this article, we will see how we can integrate flutter_bloc into our existing Email Authentication.
Bloc is one of the widely used State Management solutions as it gives us control over a lot of data and how the data is being passed. If you are completely new to bloc, feel free to check our article on flutter_bloc as well.
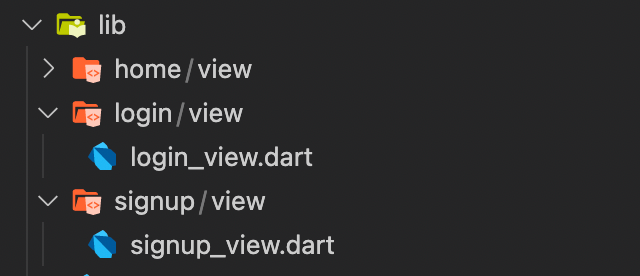
So in our previous article, we integrated Email Authentication and used Feature-Driven architecture for it, which would look somewhat like this:

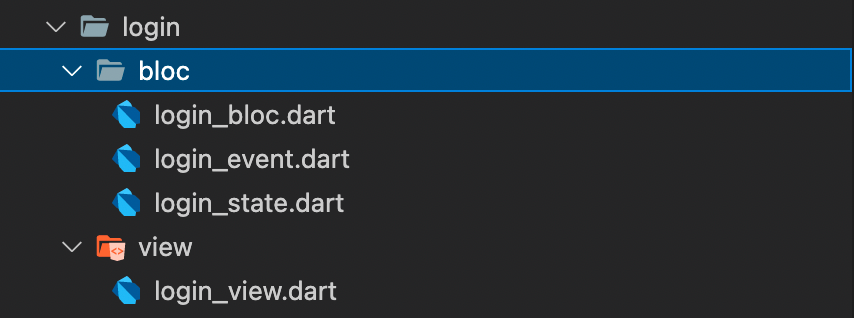
Now, let's create a bloc folder inside login folder and create 3 files; login_bloc.dart, login_event.dart and login_state.dart.

It's time to separate our business logic from the UI layer!
Let's create a few event classes based on our needs. We will create 3 classes:
1. LoginButtonPressedEvent: This will be used when the user clicks on the login button.
2. LoginEmailChangedEvent: This will be used in the onChanged method of the textfield. So this event will hold the latest value of email.
3. LoginPasswordChangedEvent: This will be used in the same way for password.
Now, let's create the state class!
login_state.dart
Here, we created 1 class, LoginState and enum LoginStatus. Along with this, we created a copyWith method, which basically means that we will be mutating the same state variable for all the status. The main change here is that, if we are not providing any value to the copyWith method, it will be using the value which we provided during creating the object of the state. Hence, the state object will always have some values, and we can update the value whenever we have the latest values!
Now, it's time for creating the main bloc part!
login_bloc.dart
In the bloc part, we need to handle 3 event classes that we created:
1.
Here, we are just calling the login method from the auth package that we created in the previous article. And if we get success, we emit the state with the new success status and message. On the other hand, if we get any exception or failure, we emit the state with failure status and the exception as the message.
2.
The way we had for email, same way we are emitting the state for password.
Time to create our bloc files for Signup functionality!
Create a folder for bloc inside signup folder and create the event, state and bloc files into it.

We are going to follow the same approach that we followed for login part!
So, let me show you quickly how all the 3 files should look like for signup bloc.
signup_event.dart
signup_state.dart
signup_bloc.dart
Just the change here is that we are calling the signup method that we created in the auth package!
Now, let's use this bloc in our UI!
Firstly, we need to provide this bloc to our widget tree.
If you notice, our bloc constructors take AuthService as the parameter. So, we will have to provide our FirebaseAuthService to the widget tree first. To do this, we can provide it in main.dart!
Here, we have used RepositoryProvider as this is something that we are going to inject as a parameter in our bloc class!
For login, let's create a new file called login_page.dart which will be just a skeleton class that will provide our LoginBloc to our login_view.dart
For Signup, similarly, we can create a file called signup_page.dart
Here, we access the FirebaseAuthService using the read method that we have in the bloc library as an extension on context.
Now, let's do some real stuff! Let's use this bloc in our UI part!
Login
So, we created an event which would hold our latest version of email for login (LoginEmailChangedEvent). We can add this event in the onChanged method of our TextField
Here, we read the instance of LoginBloc from the widget tree and add the LoginEmailChangedEvent with the latest value of the text field.
Similarly, we can do this for password:
Now, we can add the LoginButtonPressedEvent in the onPressed method of the button:
Finally, we need to wrap our form with BlocListener so that we can listen to our success and failure states:
Create Account
Now, we can do the exact same thing to create an account too!
For email:
For Password:
For submit button:
Bloc Listener part:
And that's it!
We have successfully integrated bloc to our Email Authentication.
I hope you learned something new today!
Would you like to try it by yourself? Feel free to check out our GitHub Repository and give it a go!


.png)