.png)

In the traditional development world, the handoff between design and code is often a “wall.” Designers throw Figma files over the wall, and developers spend hours (or days) translating shadows, paddings, and logic into Flutter widgets.
Today, that wall is disappearing. By combining Stitch, Claude, and the Model Context Protocol (MCP), we can now move from a creative concept to a high-fidelity Flutter app with unprecedented speed.
The Stack: Defining the Players
To understand this flow, we need to define the “Skills” and “Tools” involved:
- Stitch: The “Vibe Design” starter. It’s where we generate the initial UI look and feel using generative AI.
- Claude & MCP: The “Brain.” Using the Model Context Protocol, Claude gains the Skills to interact directly with our local environment and design APIs.
- Figma: The “Source of Truth” for UX/UI design.
- Somnio AI Tools: The “Bridge.” These MCP-ready tools ensure that the code Claude writes follows professional Flutter standards (like BLoC architecture).
- FlutterFlow: The “Accelerator” that turns Figma design system into a simple Flutter app.
Step-by-Step: Building a “Fitness Tracker” App
Let’s walk through a complete flow of how a professional team uses this stack.
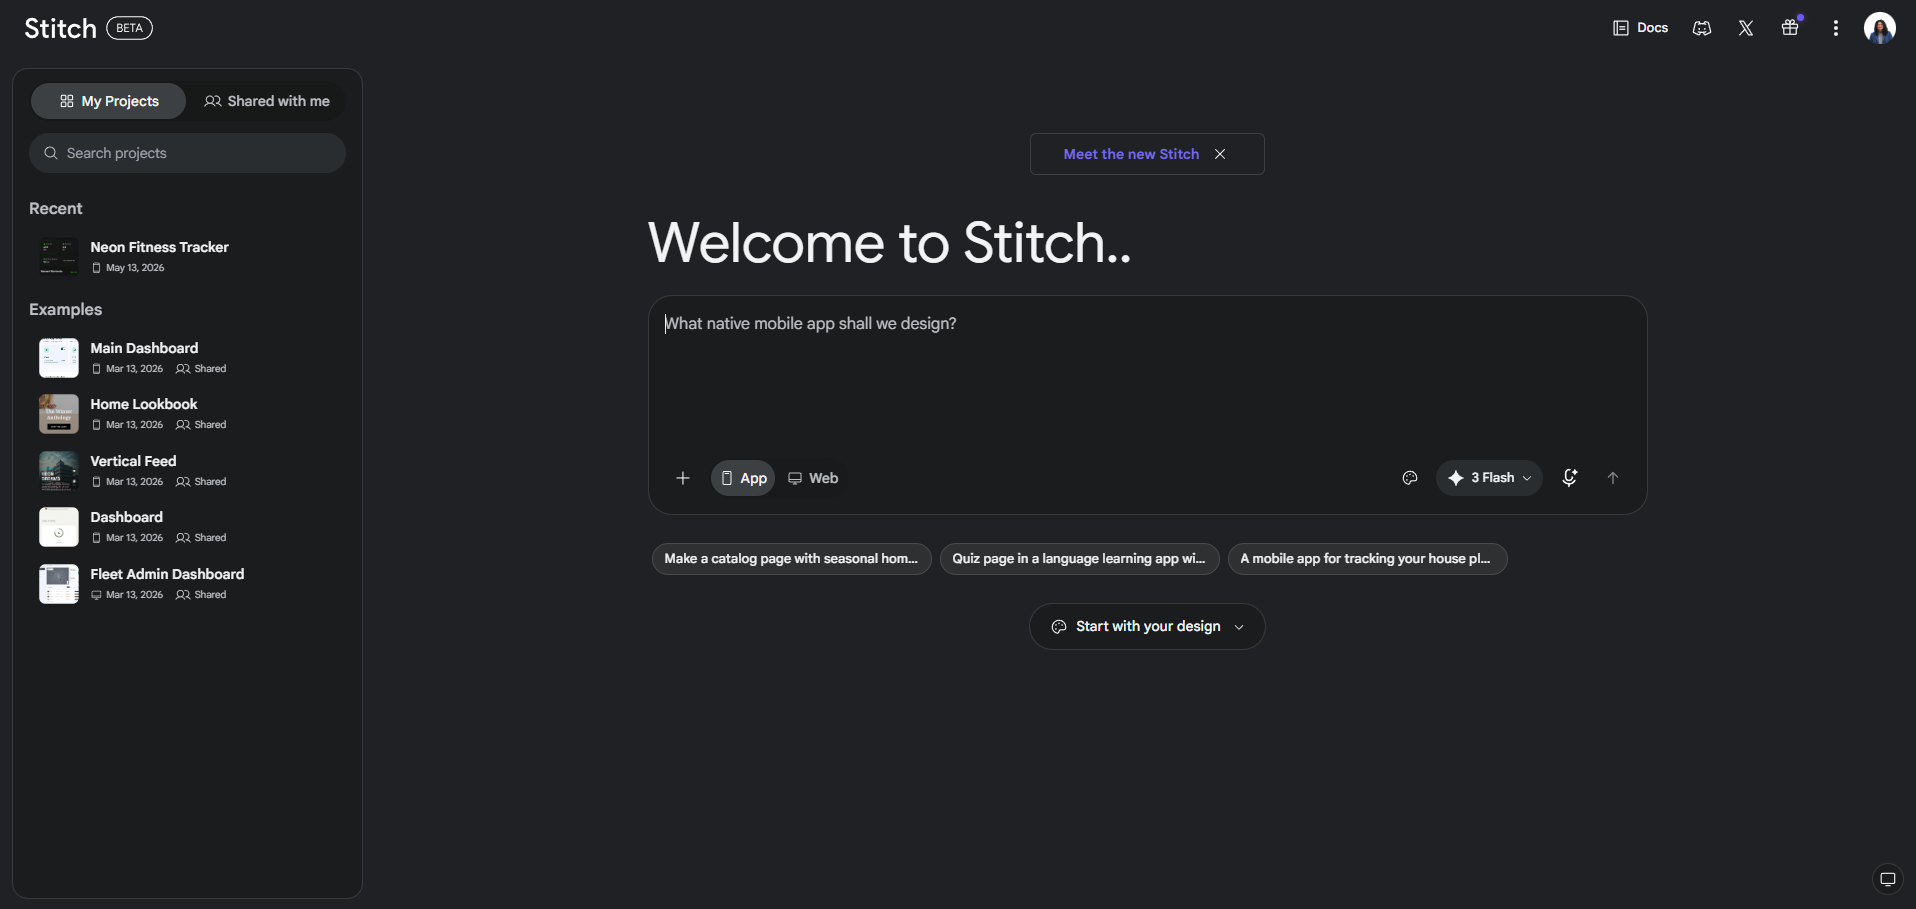
Step 1: Ideation in Stitch
We start in Stitch to define the visual language. Instead of drawing individual pixels, we describe the “vibe” and iterate until the design system feels right.
The Process:
- Generate the Initial Vibe: Provide a high-level prompt describing the mood, industry, and primary UI style.
- Define the Design System: Stitch extracts a cohesive set of colors, typography, and spacing rules from the generated visuals.
- Refine & Iterate: Use natural language to tweak specific elements (e.g., “Make the shadows softer” or “Increase the contrast of the secondary buttons”).
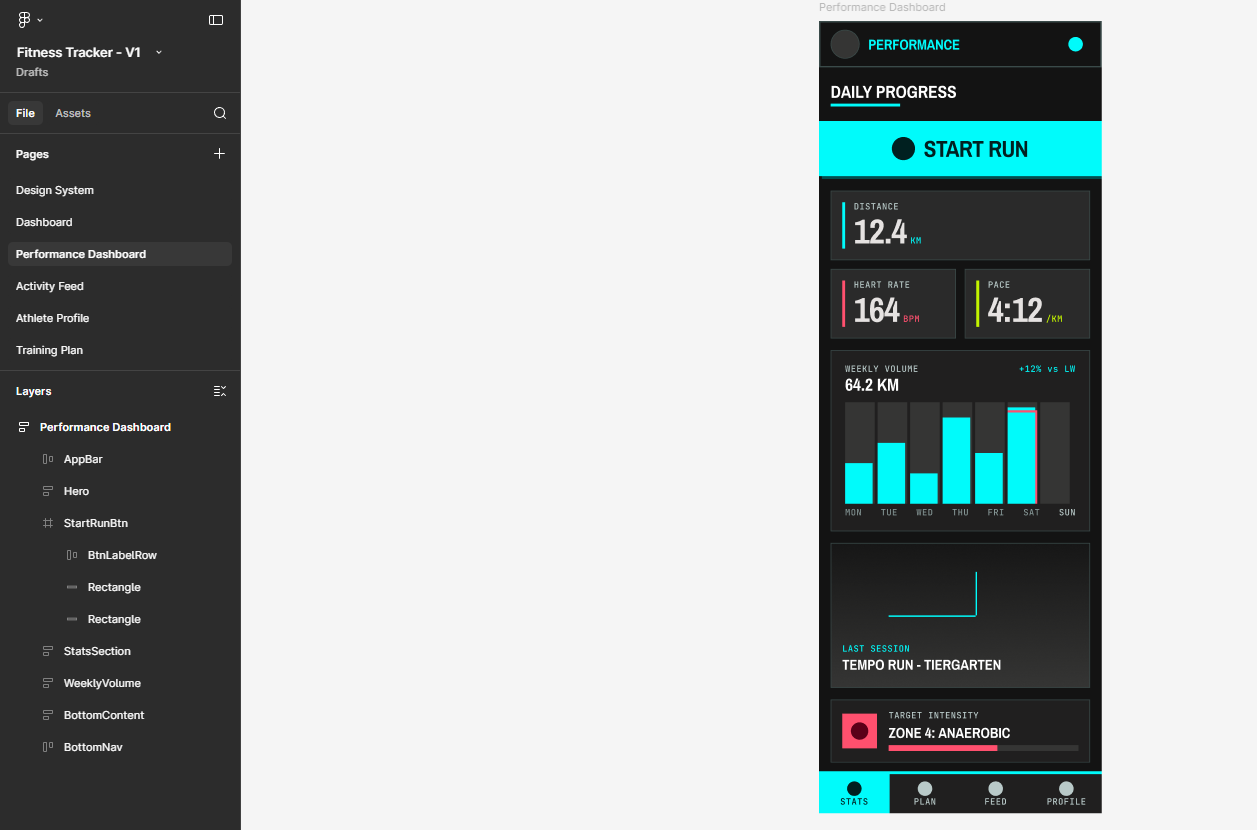
Actual Example: “The Midnight Runner” Dashboard
- The Prompt: “Create a high-energy, dark-mode fitness dashboard for marathon runners. Use a deep charcoal background with ‘Electric Cyan’ as the primary action color. The UI should feel fast, using slanted headers and condensed typography.”
- The Output: Stitch generates a home screen featuring a prominent “Weekly Mileage” gauge and a “Heart Rate” trend line.
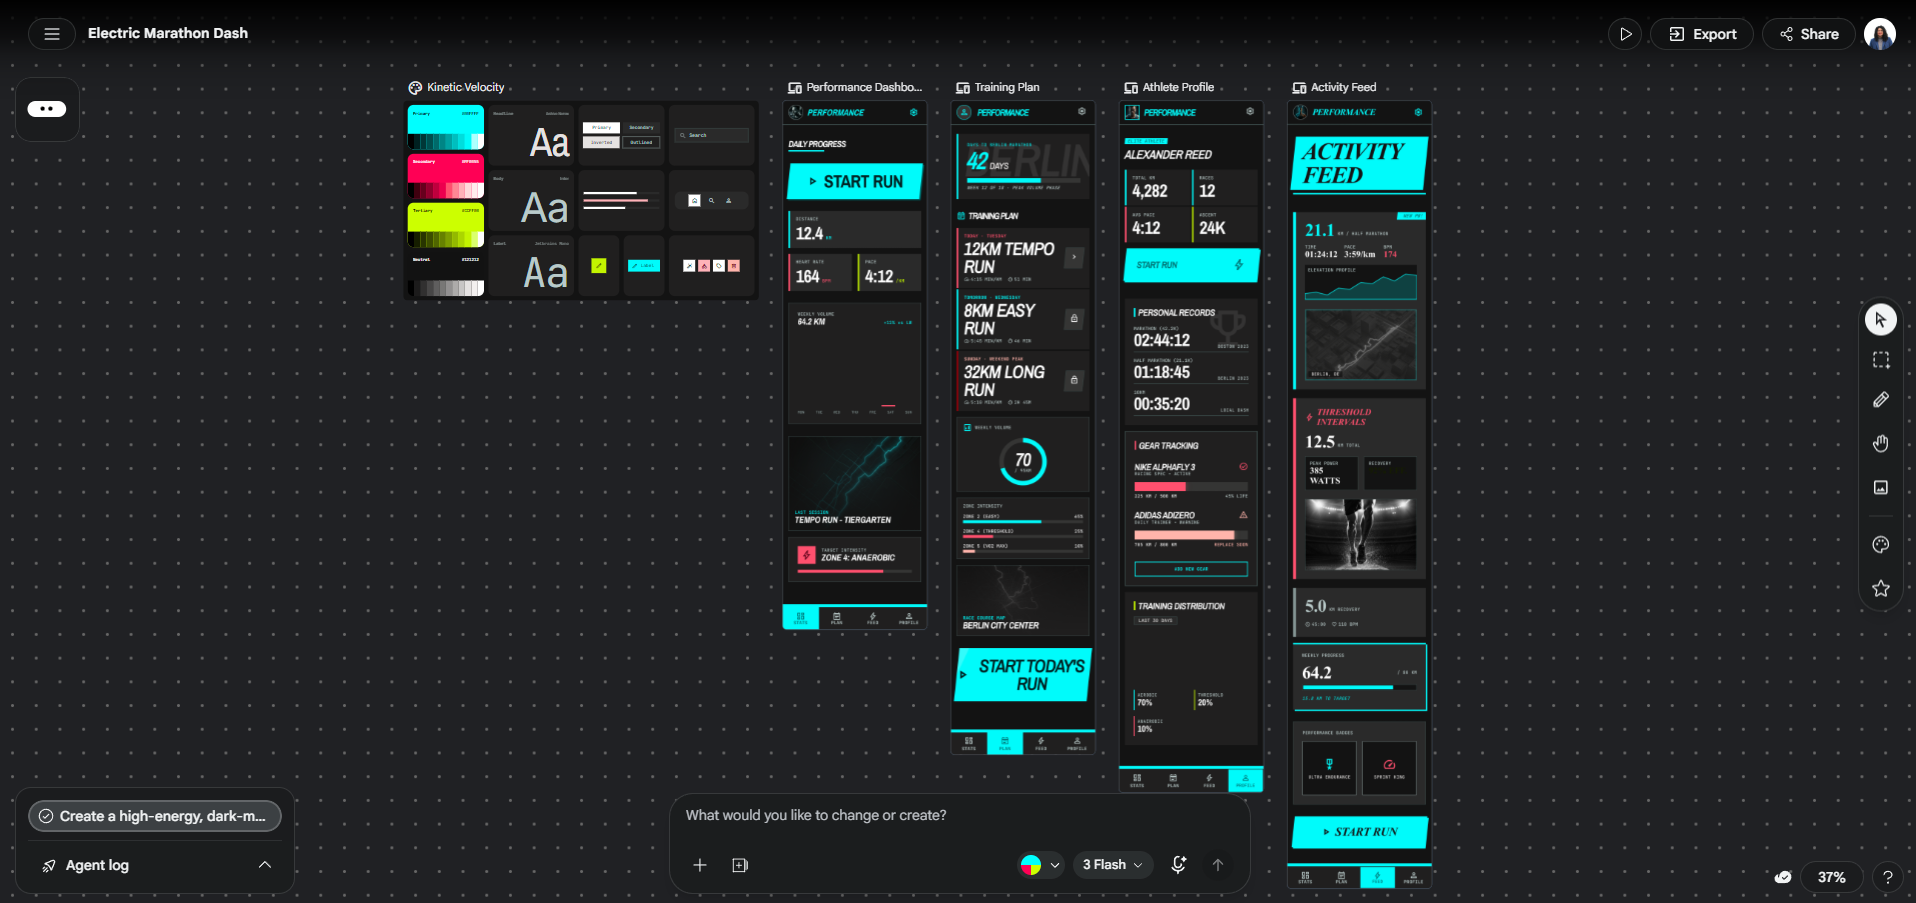
- The Design System Extraction:
- Primary: #00FFFF (Electric Cyan)
- Background: #121212 (Deep Charcoal)
- Font: Inter Tight (700 weight for headers)
- The Iteration: You decide the cyan is too bright for a night-time run, so you prompt: “Mute the Cyan by 20% and add a subtle glow effect to the progress rings.”
Note on Exporting: Once you are satisfied with the vibe, click the Export button and select the .zip option. This package contains the critical context for the next step, including the DESIGN.md file (which documents the design system), image files of the screens, and HTML references.
Step 2: Refining via Claude & MCP to Figma
In this step, we move from a “vibe” to a structured, editable UI. Claude uses the Figma MCP Server to act as a design agent, programmatically building your app’s foundation directly on the Figma canvas.
How to get from Stitch to Figma:
- Prepare the Context:
- Unzip the file exported from Stitch.
- Locate the DESIGN.md file. This is the “blueprint” that contains your color tokens, typography, and layout logic.
- Initialize the Figma MCP Connection:
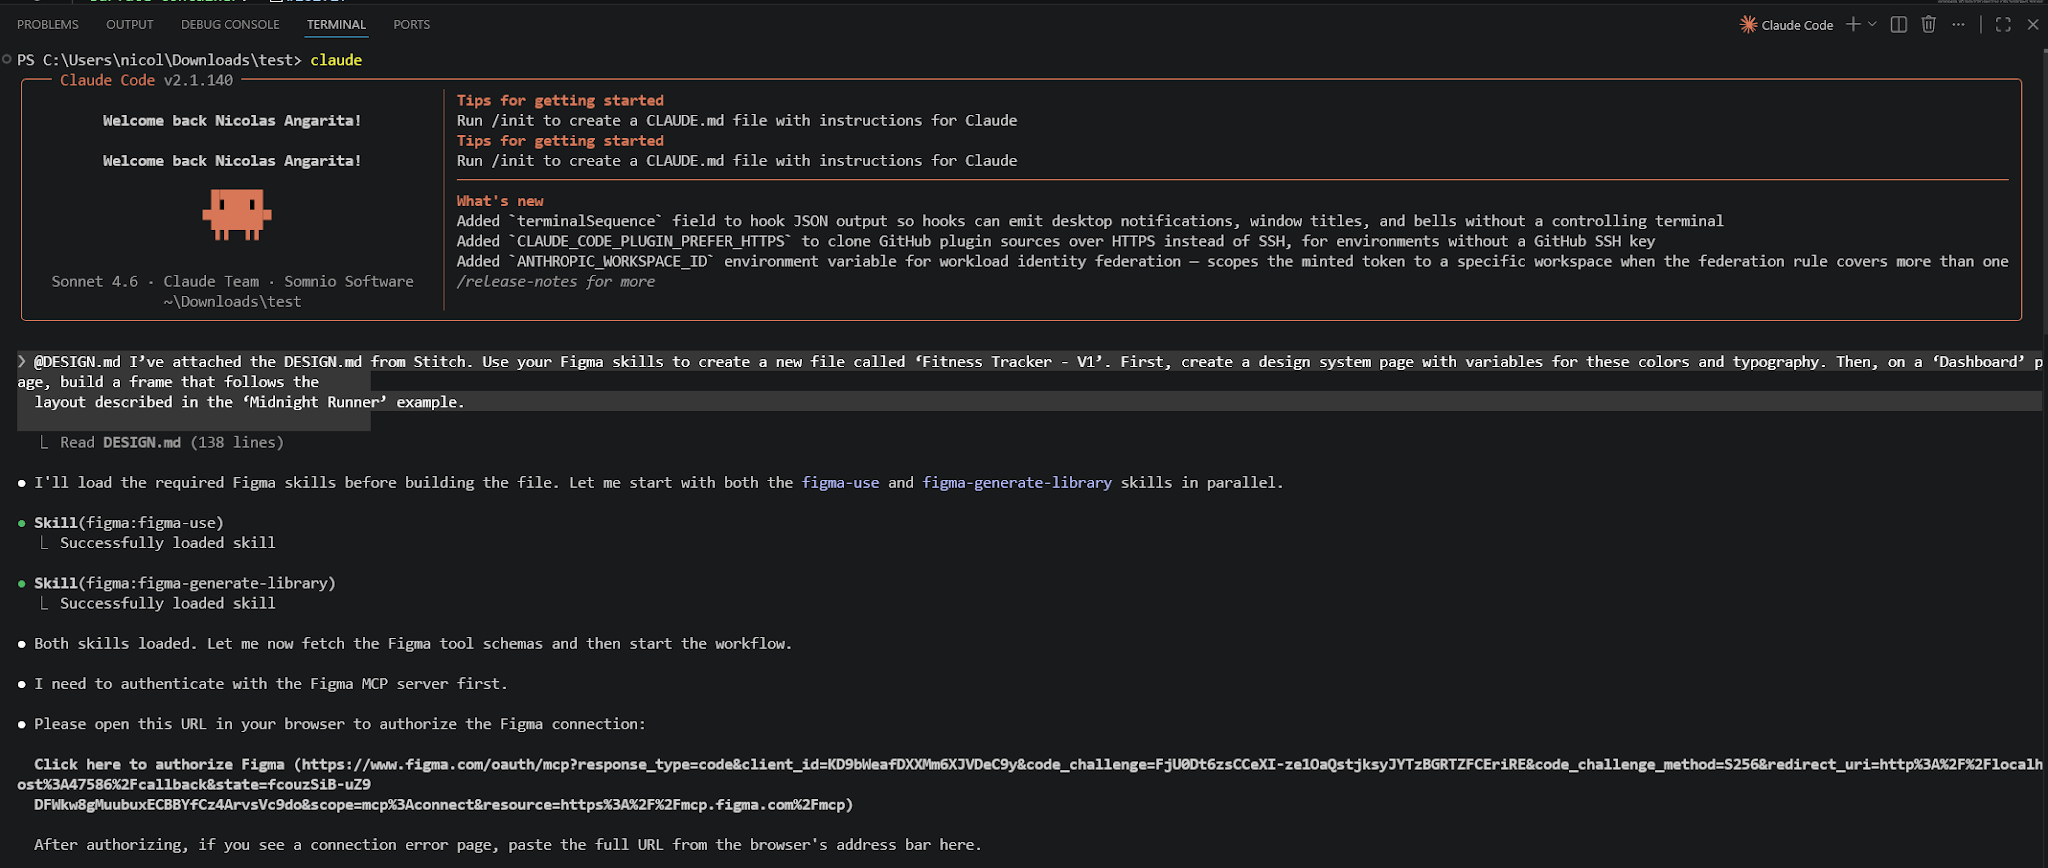
- Open Claude Desktop or Claude Code.
- Ensure the Figma MCP server is active (e.g., in Claude Code, run claude plugin install figma@claude-plugins-official).
- The “Construction” Prompt:
- Attach the DESIGN.md file (or paste its contents) into the chat with Claude.
- Give Claude the command to build the file.
- Example Prompt:
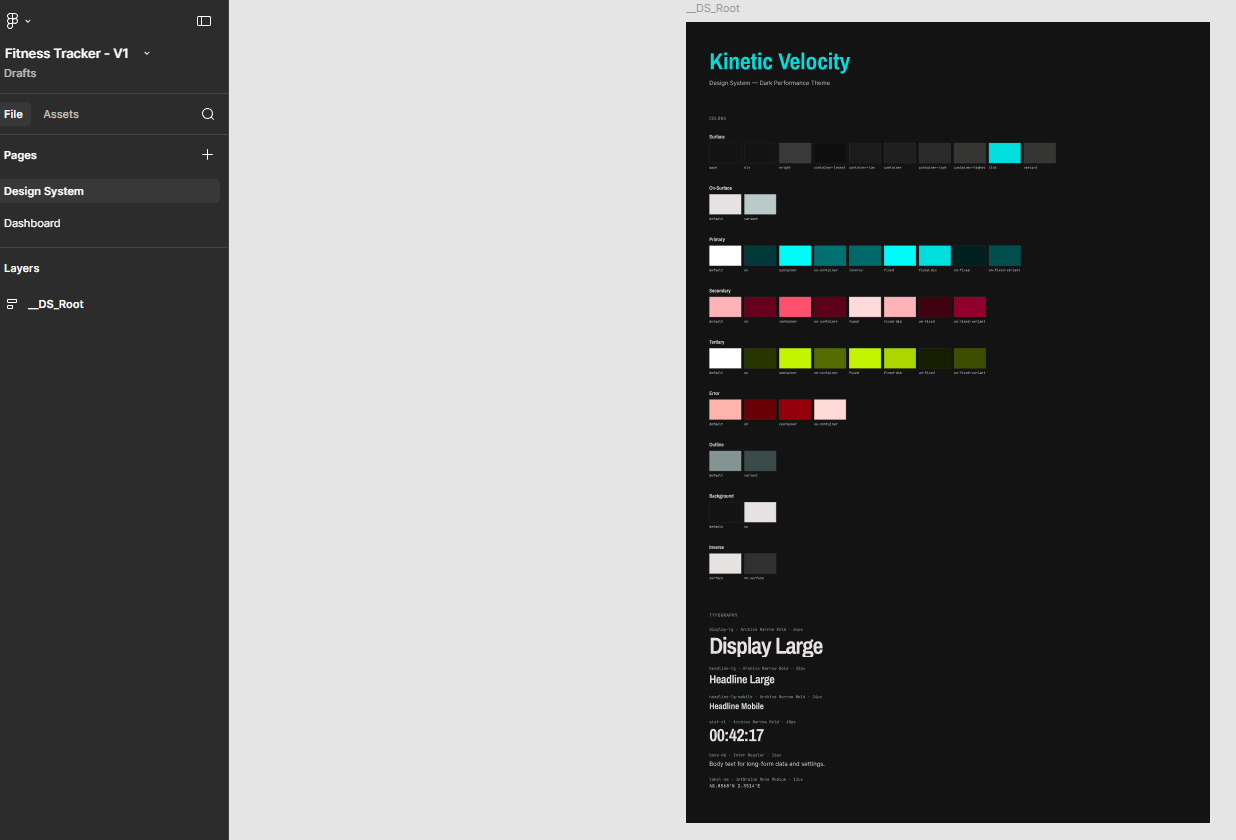
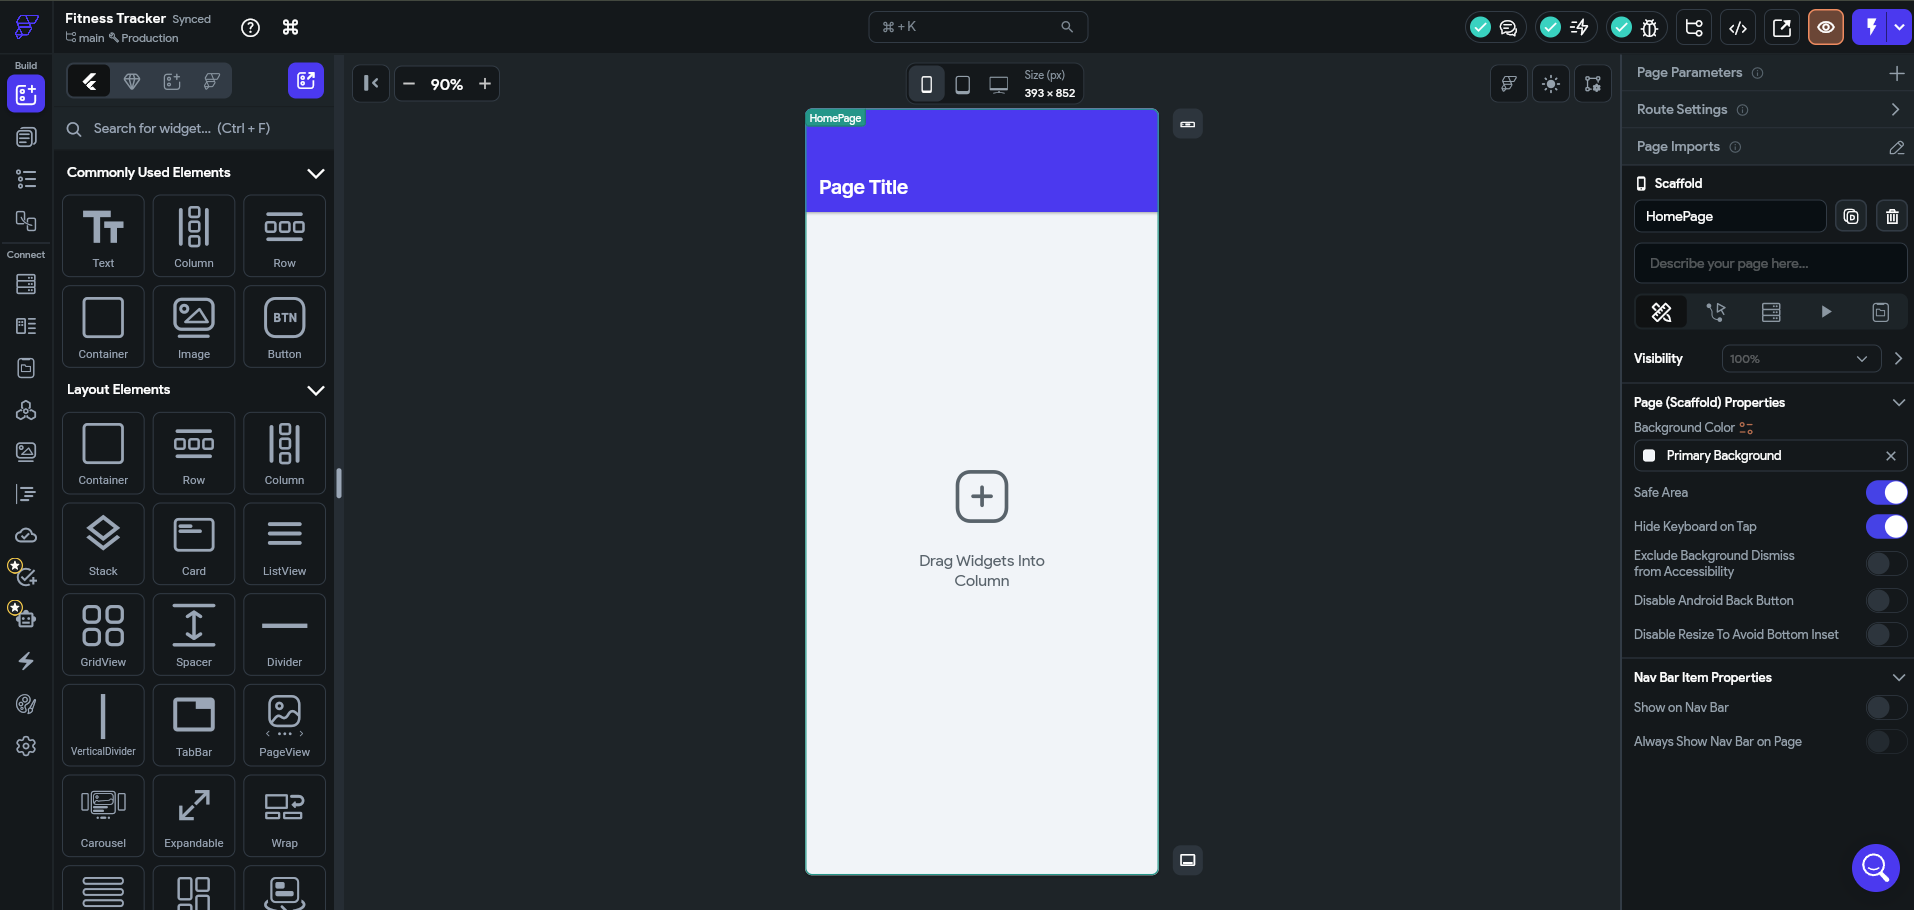
“I’ve attached the DESIGN.md from Stitch. Use your Figma skills to create a new file called ‘Fitness Tracker - V1’. First, create a design system page with variables for these colors and typography. Then, on a ‘Dashboard’ page, build a frame that follows the layout described in the ‘Midnight Runner’ example.”
- The “Screen Generation” Prompt:
- Once the variables are set, upload the screenshots of the screens exported from Stitch.
- Prompt: “Now, using the design system variables you just created, look at these screenshots and reconstruct the ‘Dashboard’ and ‘User Profile’ screens as native Figma frames. Use Auto-Layout where possible to ensure they are responsive.”
- Verification & Iteration:
- Claude will call tools like figma-create-new-file and figma-generate-design.
- Watch your Figma canvas update in real-time as Claude builds layers, applies auto-layout, and binds variables to tokens.
Pro Tip: If a component doesn’t look right, don’t move it manually yet. Tell Claude: “The progress ring should be centered and have a 24px padding from the top.” Let the AI handle the structural alignment.
Why this matters: By using the MCP, you aren’t just copy-pasting images. You are generating native Figma layers that are programmatically linked to the design system rules established in Stitch. This creates a high-fidelity “Source of Truth” that is ready for the next step: FlutterFlow.
Step 3: Figma to FlutterFlow
In this stage, we use FlutterFlow to convert the Figma design system into a structured Flutter theme. We don’t try to import every screen here; instead, we focus on getting the “bones” (Colors, Fonts, and Theme Widgets) right before moving to the IDE.
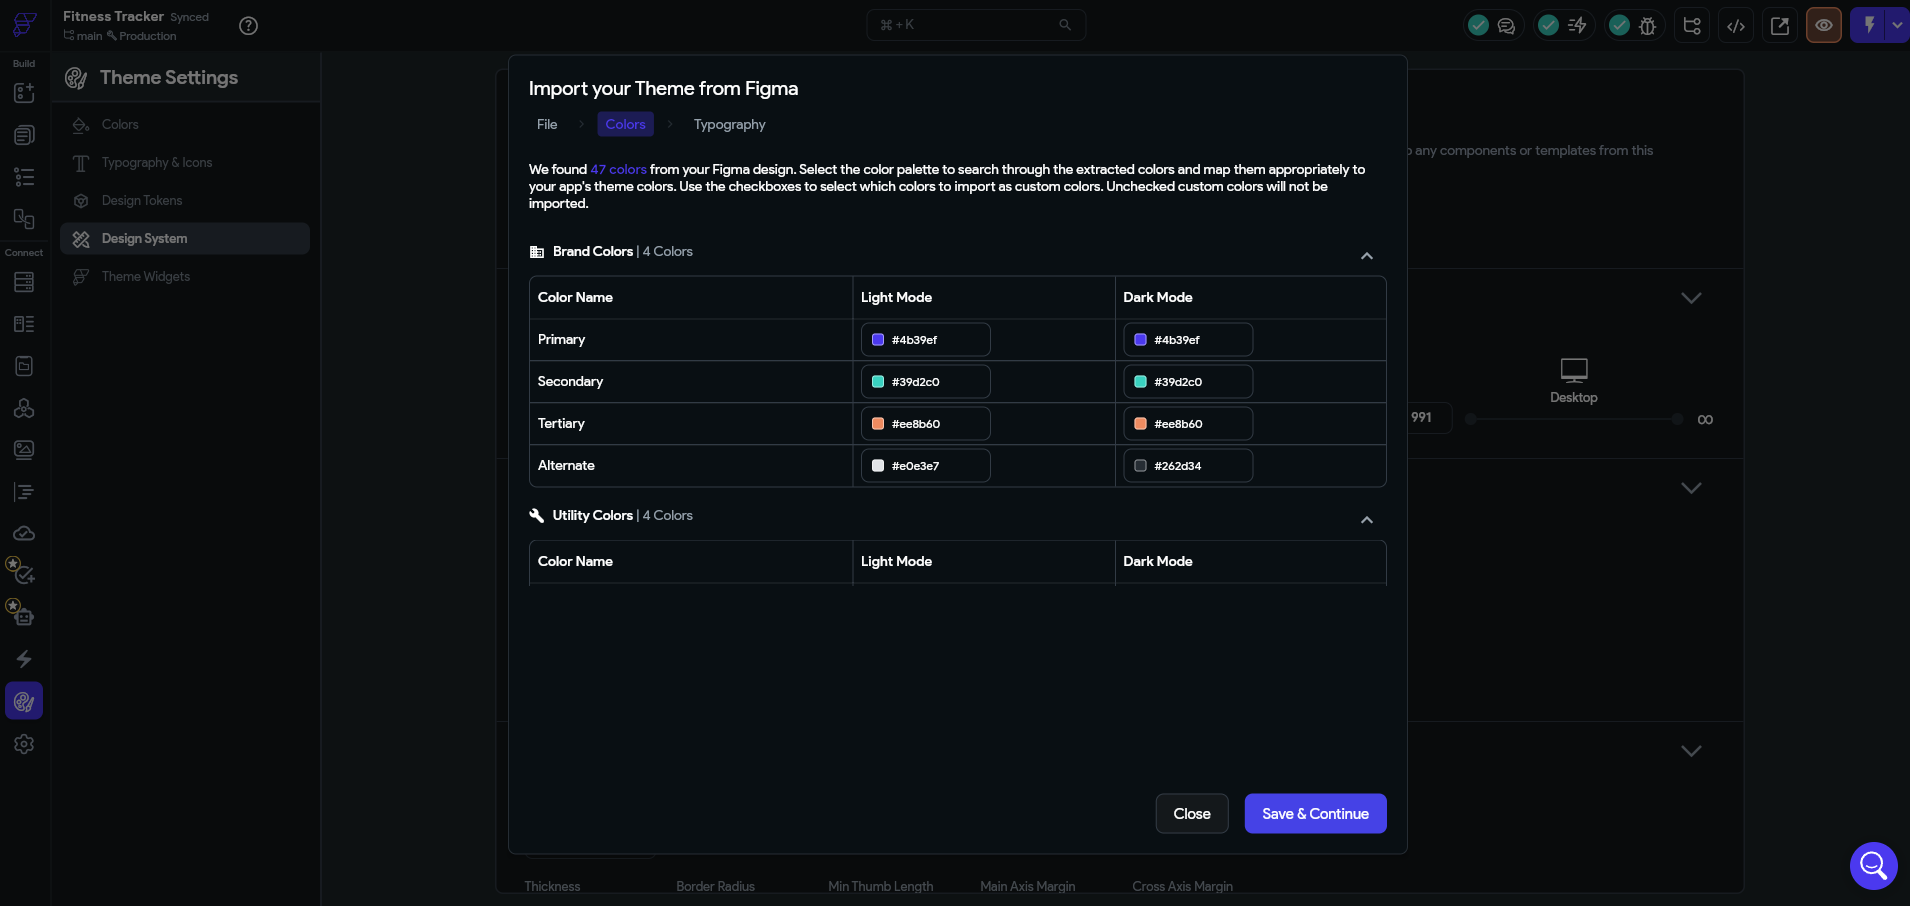
1. Import the Design System:
- Open your project in FlutterFlow.
- Navigate to Theme Settings > Design System.
- Click Connect to Figma and authorize your account.

- Paste the Figma File URL for the project Claude just created.
- FlutterFlow will fetch the styles. Map the Figma color and text styles to the corresponding FlutterFlow theme variables.
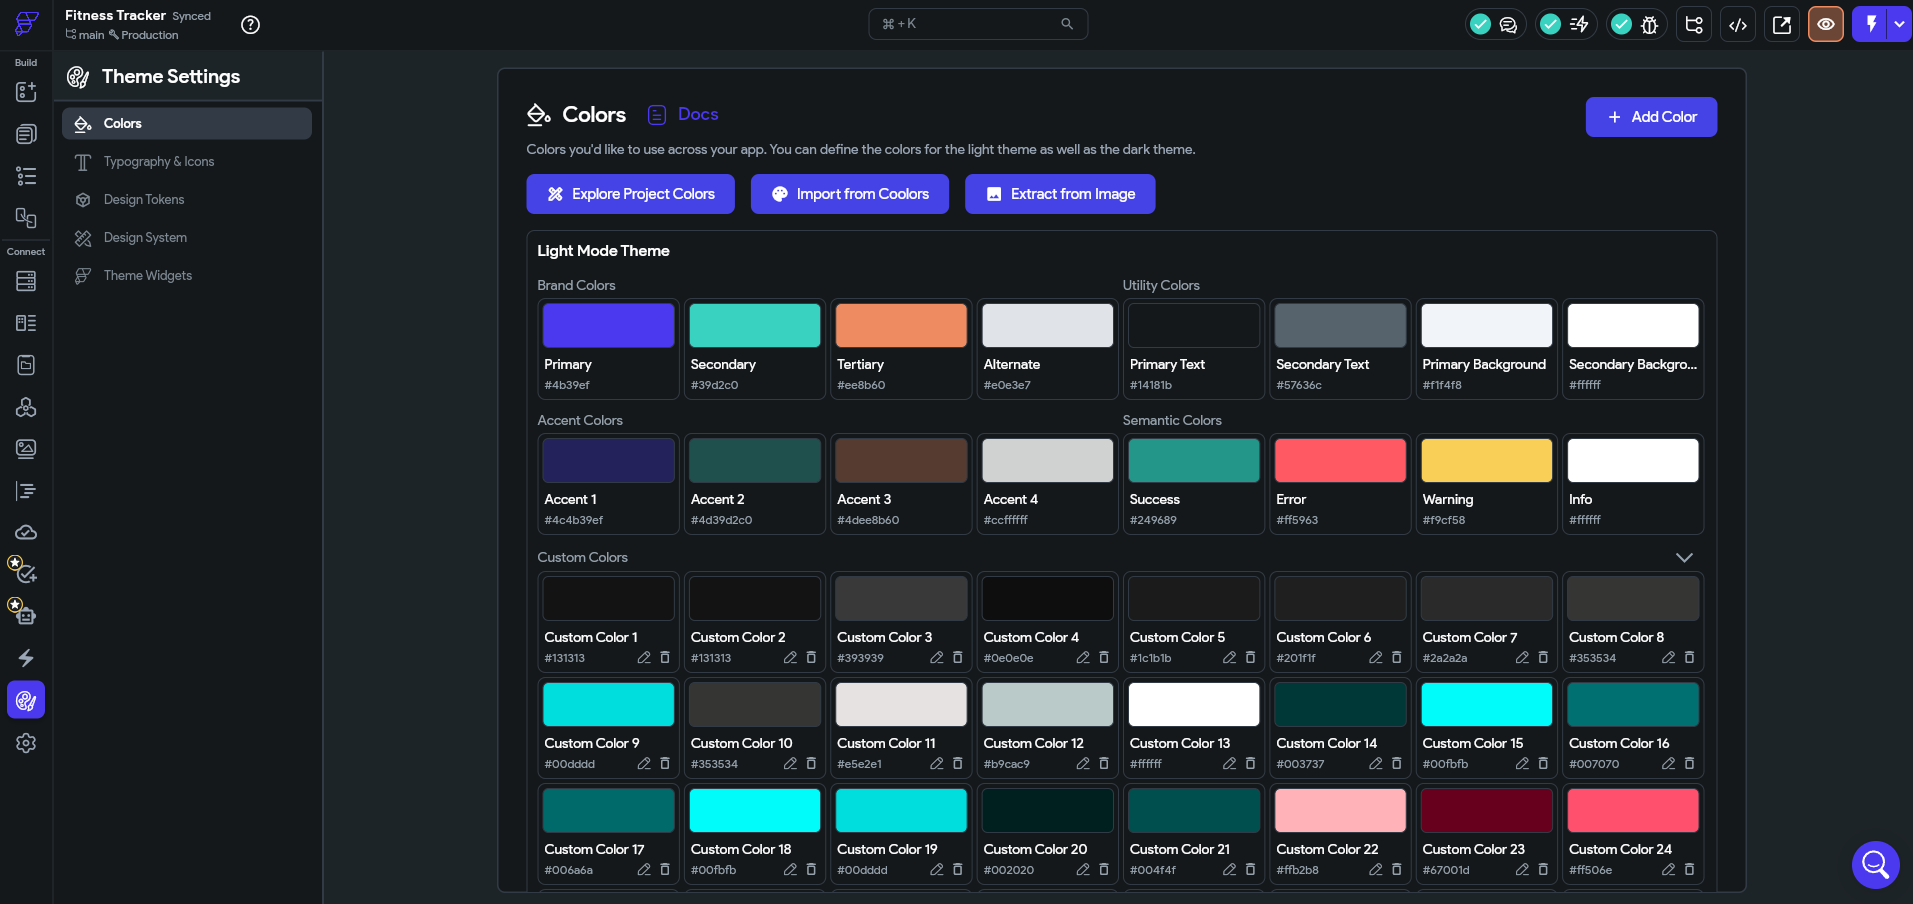
2. Set Up the “Shell”:
- Ensure your Primary, Secondary, and Background colors match the Stitch DESIGN.md.
- (Optional) Create one blank page in FlutterFlow named MainPage. This acts as the entry point for the code export.
3. Export & Download the Project: Now, we move the project out of the browser and into your local development environment where the Somnio AI Tools can take over.
- Click the Developer Menu (</>) icon in the top right corner of the FlutterFlow toolbar.
- Select Download Code. This will generate a .zip file containing a full Flutter project with your theme, dependencies, and boilerplate already configured.
- Alternative (Pro): Use the FlutterFlow CLI to export directly: flutterflow export-code --project <project-id> --token <your-api-token>.
Step 4: Enterprise-Grade Code with Somnio AI Tools
This is where we move from a “prototype” to a “product.” We export the code from FlutterFlow and open it in our IDE.
This is where the Somnio AI Tools shine. We use Claude to audit and refine the exported code:
1. Setup the Somnio CLI & Skills
First, you need to equip Claude with the specific “know-how” for Somnio’s architectural standards.
- Install the Somnio CLI:
Bash
dart pub global activate --source git
https://github.com/somnio-software/flutter-health --git-path cli
- Install the Flutter Skills: This command downloads the “blueprints” for BLoC and Clean Architecture into your project’s .agents/skills folder:
Bash
npx skills add somnio-software/somnio-ai-tools
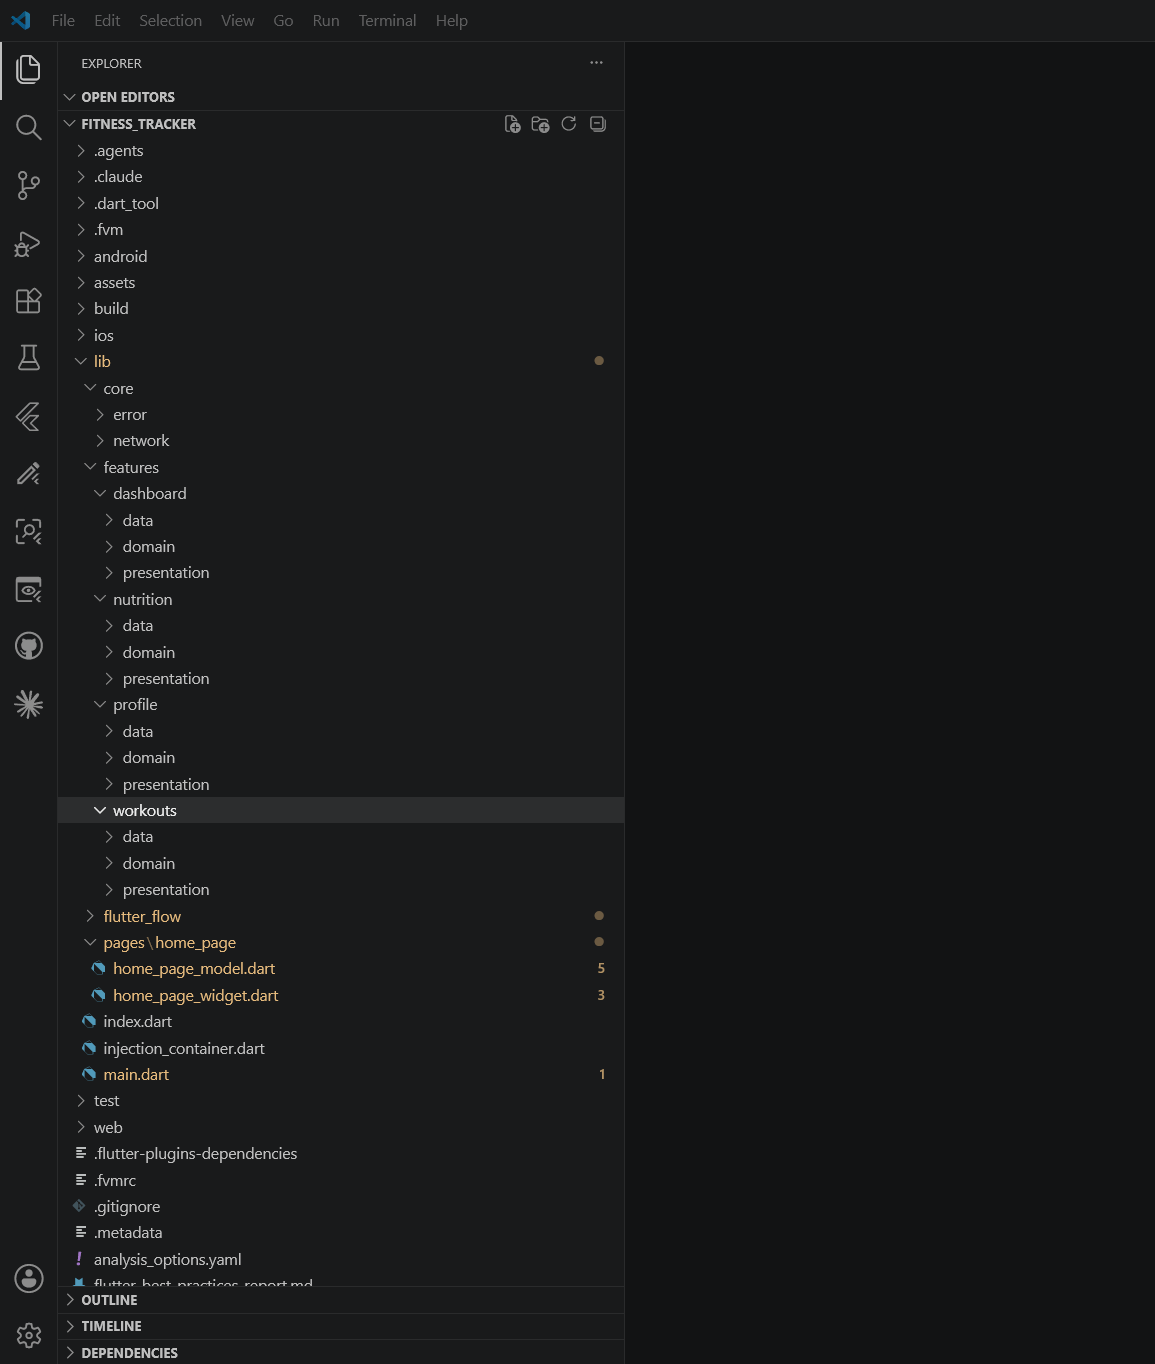
2. Command: Restructure to Clean Architecture
Now, ask Claude to reorganize the flat FlutterFlow structure into a layered architecture (Data, Domain, UI). We can do this asking to fix the project architecture after asking for a Flutter audit.
3. Command: Implement BLoC State Management
FlutterFlow often uses simple state management. We will now upgrade this to BLoC. We can also do this asking Claude and based on the Flutter audit.
4. Command: The Flutter Health Audit (/somnio-fh)
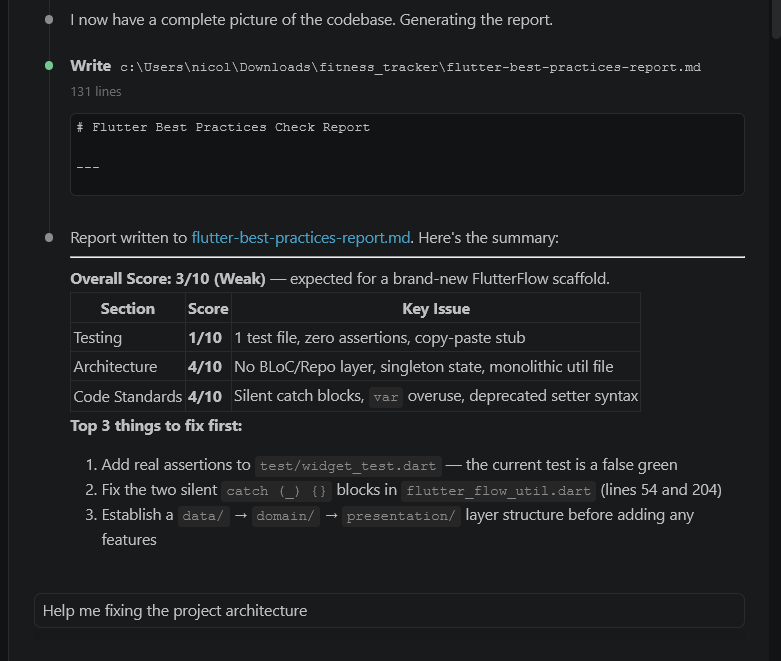
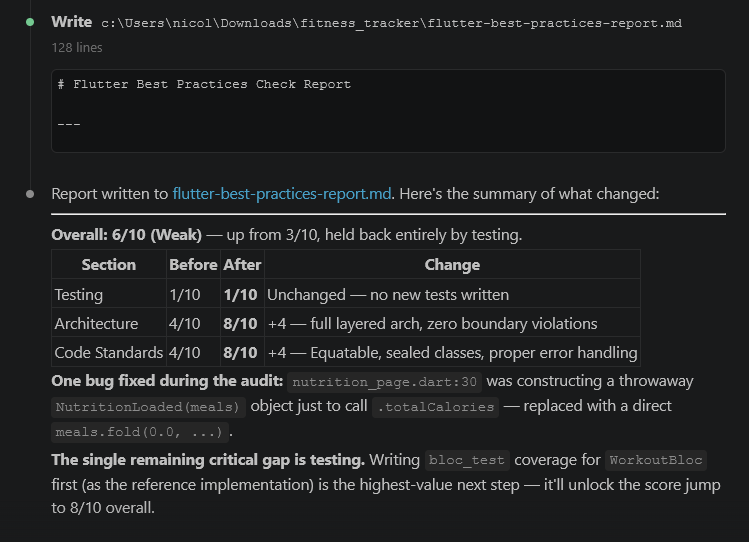
The most powerful tool in the Somnio suite is the Health Audit. This runs an automated check against 15+ architectural rules to ensure the AI didn’t create technical debt.
- Command: Type /somnio-fh in the chat.
- What it does: * Checks for hardcoded values: Ensures all colors/spacing match your DESIGN.md.
- Logic Separation: Verifies no business logic is leaking into the UI.
- Performance: Audits widget rebuild patterns.
- Result: It generates a structured report (e.g., flutter_health_report.md) with a list of “Violations” and “Fixes” that Claude can then execute automatically.
Why This Matters for UX/UI Design
This workflow doesn’t replace designers; it gives them Superpowers.
- Lower Friction: The distance between an idea and a prototype is reduced to minutes.
- Consistency: By using MCP, the design rules defined in the beginning (the “Skills”) stay consistent all the way through to the final Flutter codebase.
- Quality: With the Somnio AI Tools, we ensure that even though we are moving fast, we aren’t creating technical debt.
Conclusion
The future of Flutter development is “AI-Assisted, Human-Guided.” By leveraging Stitch for the spark, Figma for the vision, and Somnio’s MCP tools for the execution, we are entering a new era of software craftsmanship.


.png)
.png)