Table of Contents
In this blog post, we will delve into the realm of app push notifications in Flutter, aiming to demystify the process of working with them. We will learn to integrate and use push notifications in a project, while highlighting crucial considerations that developers should keep in mind while dealing with them.
Learning the basics of Push Notifications in Flutter
To kickstart our discussion, we'll start with the basics, providing you with fundamental concepts that will enhance your understanding of push notifications in Flutter.
What are Push Notifications?
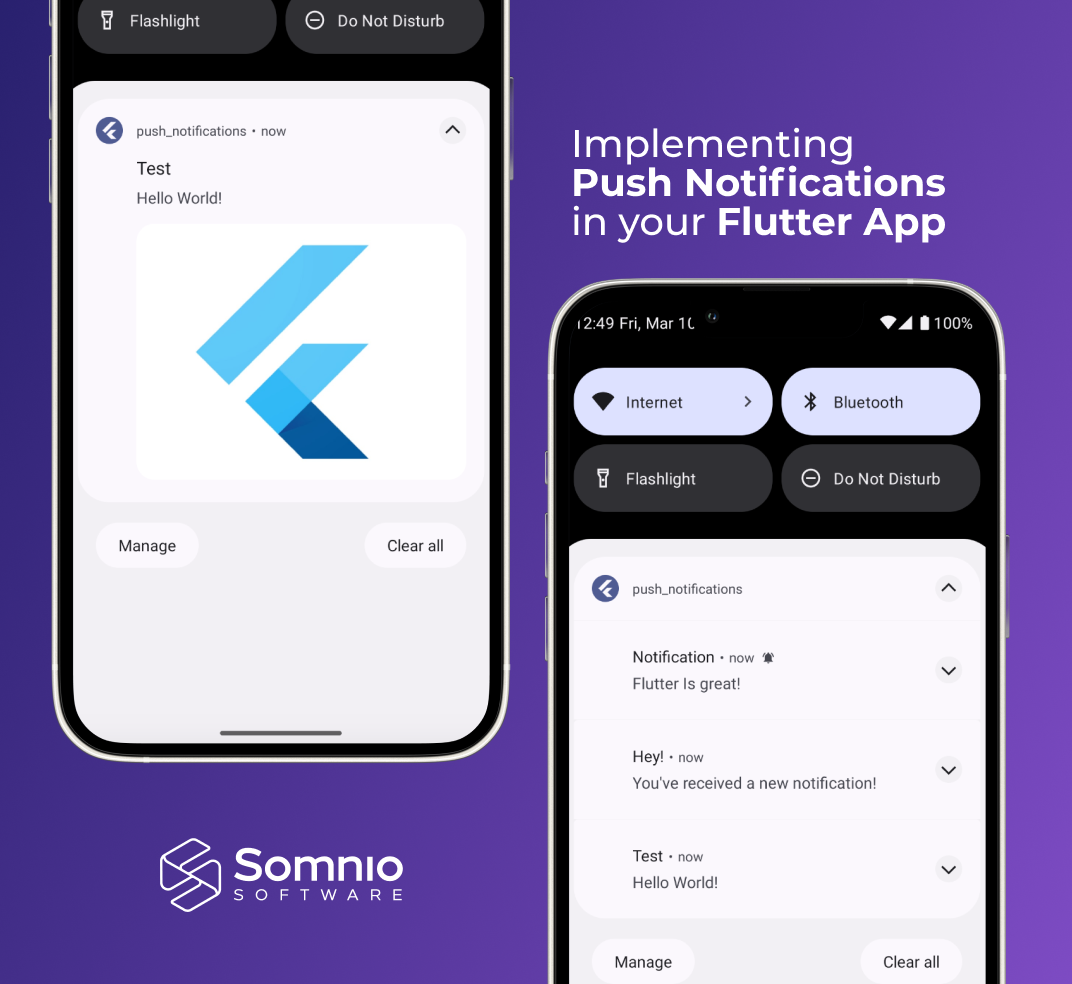
Push notifications are a powerful tool used to notify and promote events of interest to users. These notifications appear on the client application upon receiving them. Typically, push notifications are concise messages that appear on the primary screen of a mobile or computer device. When a user taps on the notification, they are directed straight to the application.
What is Firebase Cloud Messaging?
Firebase Cloud Messaging or FCM is a cross-platform messaging solution that allows you to send remote messages securely and at no cost. This service is available on Android, iOS, macOS and web.
FCM Architecture Overview
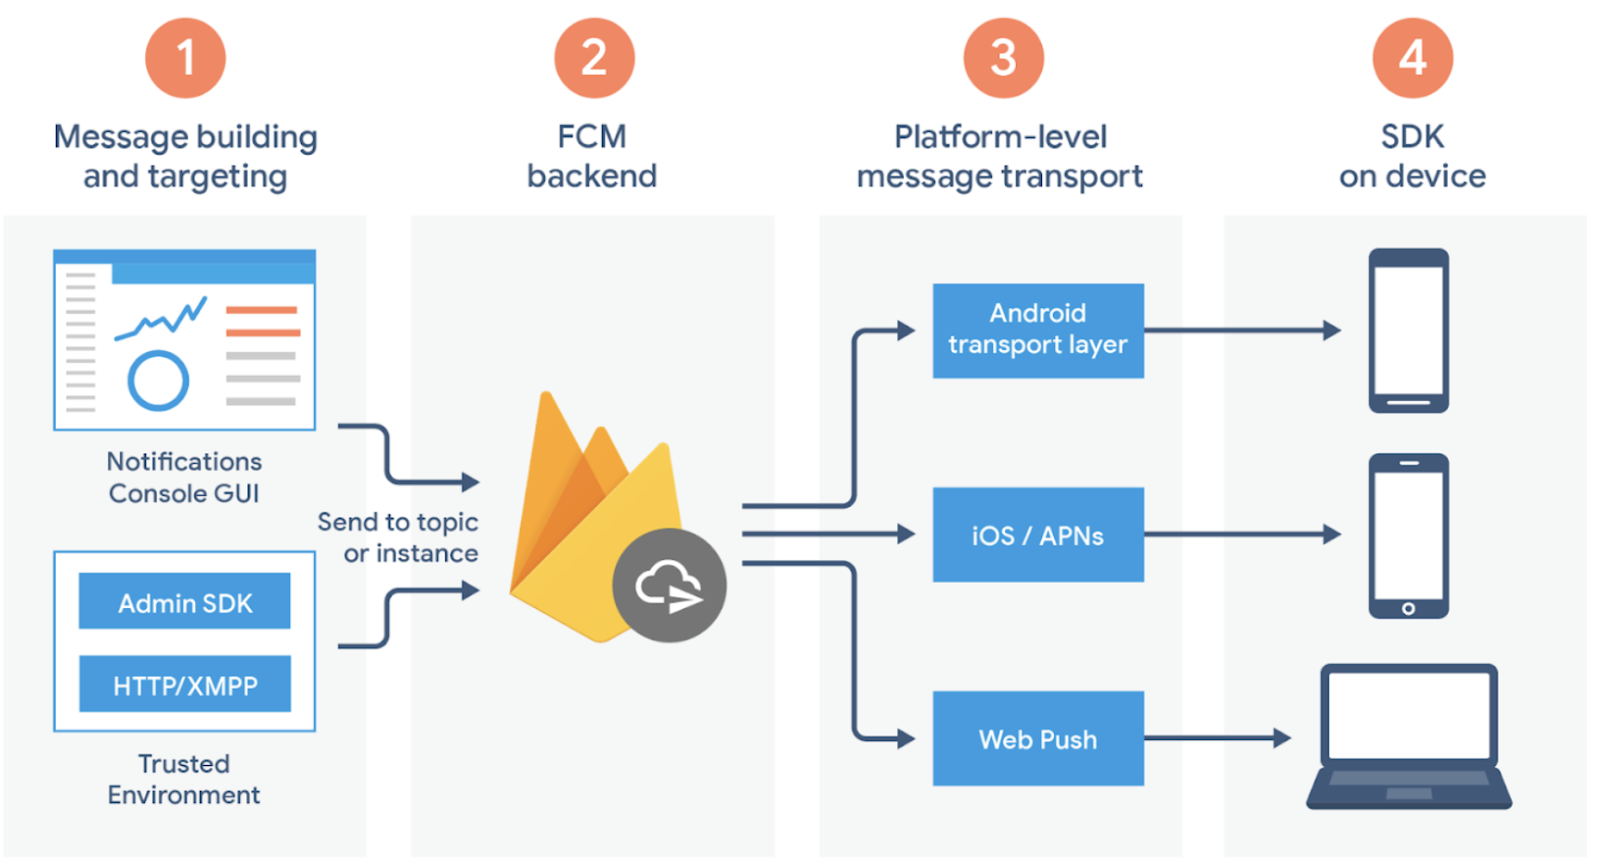
The diagram showed above depicts the architecture used by Firebase for delivering push notifications to each platform. Here's a brief description of the components involved:
- The tools used for triggering notifications can either be the Firebase Console GUI or a secure environment such as a server with the Firebase Admin SDK installed or following the FCM protocols. This environment could be a Cloud Function or your own server.
- The FCM backend accepts message requests and generates metadata such as the ID.
- The platform-specific transport layer routes the message to the selected device, handles message delivery, and applies platform-specific settings.
- The FCM SDK is present on the user's device, where notifications are displayed or messages are handled depending on the state of the application.
Message Types
FCM offers two types of messages:
- Notifications: Also known as 'display messages'. They are handled by the FCM SDK.
- Data: They are handled by the client application and are used to silently send a message to the app.
Notification messages contain a predefined set of user-visible keys. Data messages, by contrast, contain only your user-defined custom key-value pairs. Notification messages can contain an optional data payload.
You can use notification messages when you want the FCM SDK to handle displaying a notification automatically when your app is running in the background. Use data messages when you want to process the messages with your own client app code.
Handling Messages
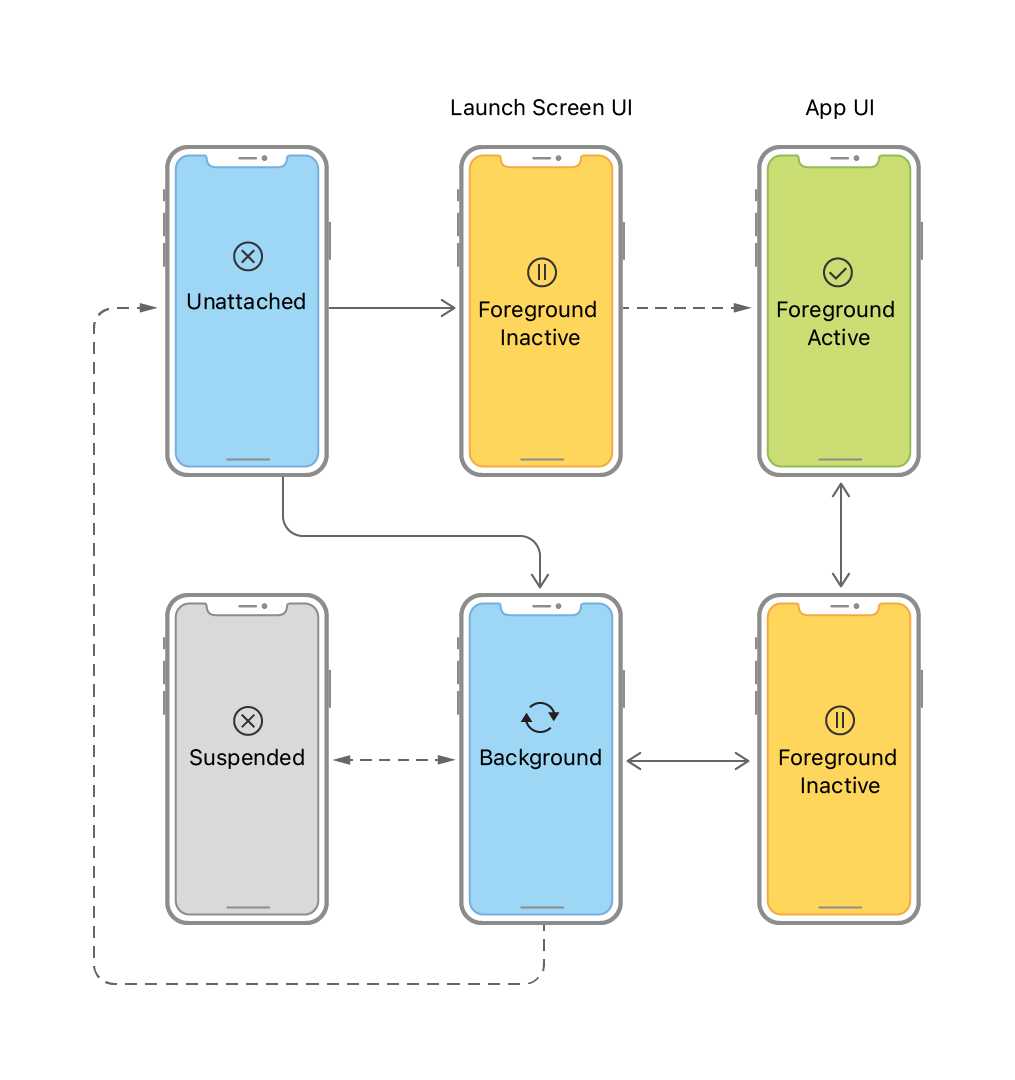
Received messages are handled based on the state of the device:
- Foreground: When the app is open, in view and in use.
- Background: When the app is open but in the background (minimized).
- Terminated: When the device is locked or the app is not running
Creating our example Flutter app
Let's create a Flutter app to see push notifications in action.
First, we will need to follow these steps:
- Create a project in Firebase and start the Messaging service.
- Create a Flutter app.
- Configure iOS and web. Android does not need extra configuration.
Creating a Firebase project is a simple process, and you can refer to the getting_started_with_firebase documentation for guidance. Once all the platforms are configured, we can proceed with implementing the code to receive messages. In case you want to see the code, you can find it in my GitHub here.
Flutter project structure
Once we create our app using flutter create, let's define the structure we’ll be using:
First, let's describe the packages folder. Here we have our notification_repository package which will be in charge of defining the notifications domain and communicating with external services. After we create the package, we are going to integrate firebase_messaging to be able to receive PNs. For that, we must first add it as a dependency to the project by running the following command in the terminal:
Once the dependency is added, we are going to create a NotificationRepository class to perform the integration:
In this class, we’ll define the following important methods:
- _initialize
- onNotificationOpened
- onForegroundNotification
_initialize
Let's break down this method, as there are a lot of steps to consider:
- First, we need to request permission from the user to send push notifications on Web and iOS platforms. We can accomplish this by using the FirebaseMessaging.requestPermission method. If the permission status is AuthorizationStatus.authorized, then we are good to go.
- In many cases, the app may be in a Terminated state when a notification is received. To retrieve the notification information from the app, we must call the FirebaseMessaging.getInitialMessage method.
- The device token is a unique identifier required to send notifications to a specific device. This is particularly useful when testing push notifications on a specific device. However, on the web, we need to send the vapidKey (which we will discuss later). We can simply call the getToken method to obtain the device token and then send it to the server.
- Finally, we can broadcast the initial message (if applicable) through the 'open' Notifications Stream so that clients can respond to it using the onMessageOpened method.
onNotificationOpened
The onNotificationOpened stream is a useful tool that emits events when a user interacts with a push notification. When a user taps on a notification, the stream will emit an event which can be used to perform specific actions within the application.
For example, you can use this stream to deep link users to a specific page within your app based on the notification they tapped. If the app was terminated when the notification was received, you can use the FirebaseMessaging.getInitialMessage() method to retrieve the notification and then emit it through the stream to react in the application layer.
onForegroundNotification
It’s a Notification Stream that emits events when a notification is received, with the app in 'Foreground'. When your app is in foreground state, you won't receive an OS notification, therefore you need to handle it differently. You can listen to this Stream to display a Dialog, show a SnackBar or to simply redirect the User to a specific part of your app or ask them to perform a specific action.
With that, we finish our notifications repository, and we can start using it in our app. Note that this can be reused in other Flutter projects.
At the application level, specifically under the lib folder, the NotificationBloc is being created as part of the notification feature. The purpose of the NotificationBloc is to subscribe to the Streams provided by the NotificationRepository and emit states to the UI. By doing this, the app can properly handle notifications and update the UI accordingly.
In the NotificationBloc, the first step is to subscribe to the Streams provided by the NotificationRepository. This allows the bloc to emit a new status when a notification is received while the app is in the foreground, or perform an action when the user enters the app after opening a notification while the app was in the background.
To react to the changes in the NotificationBloc state from the UI, a BlocListener is used to subscribe to the state changes. Based on the type of notification, the UI can navigate to the corresponding screen or display a SnackBar. Here we can see this in action:
Topics
Let's slightly change our topic to topics (pun intended). They are a powerful feature that allows devices to subscribe or unsubscribe from various topics. It is based on the publish/subscribe model, where messages are sent to a topic rather than a specific device token. Any device that has subscribed to that topic will receive the notification.
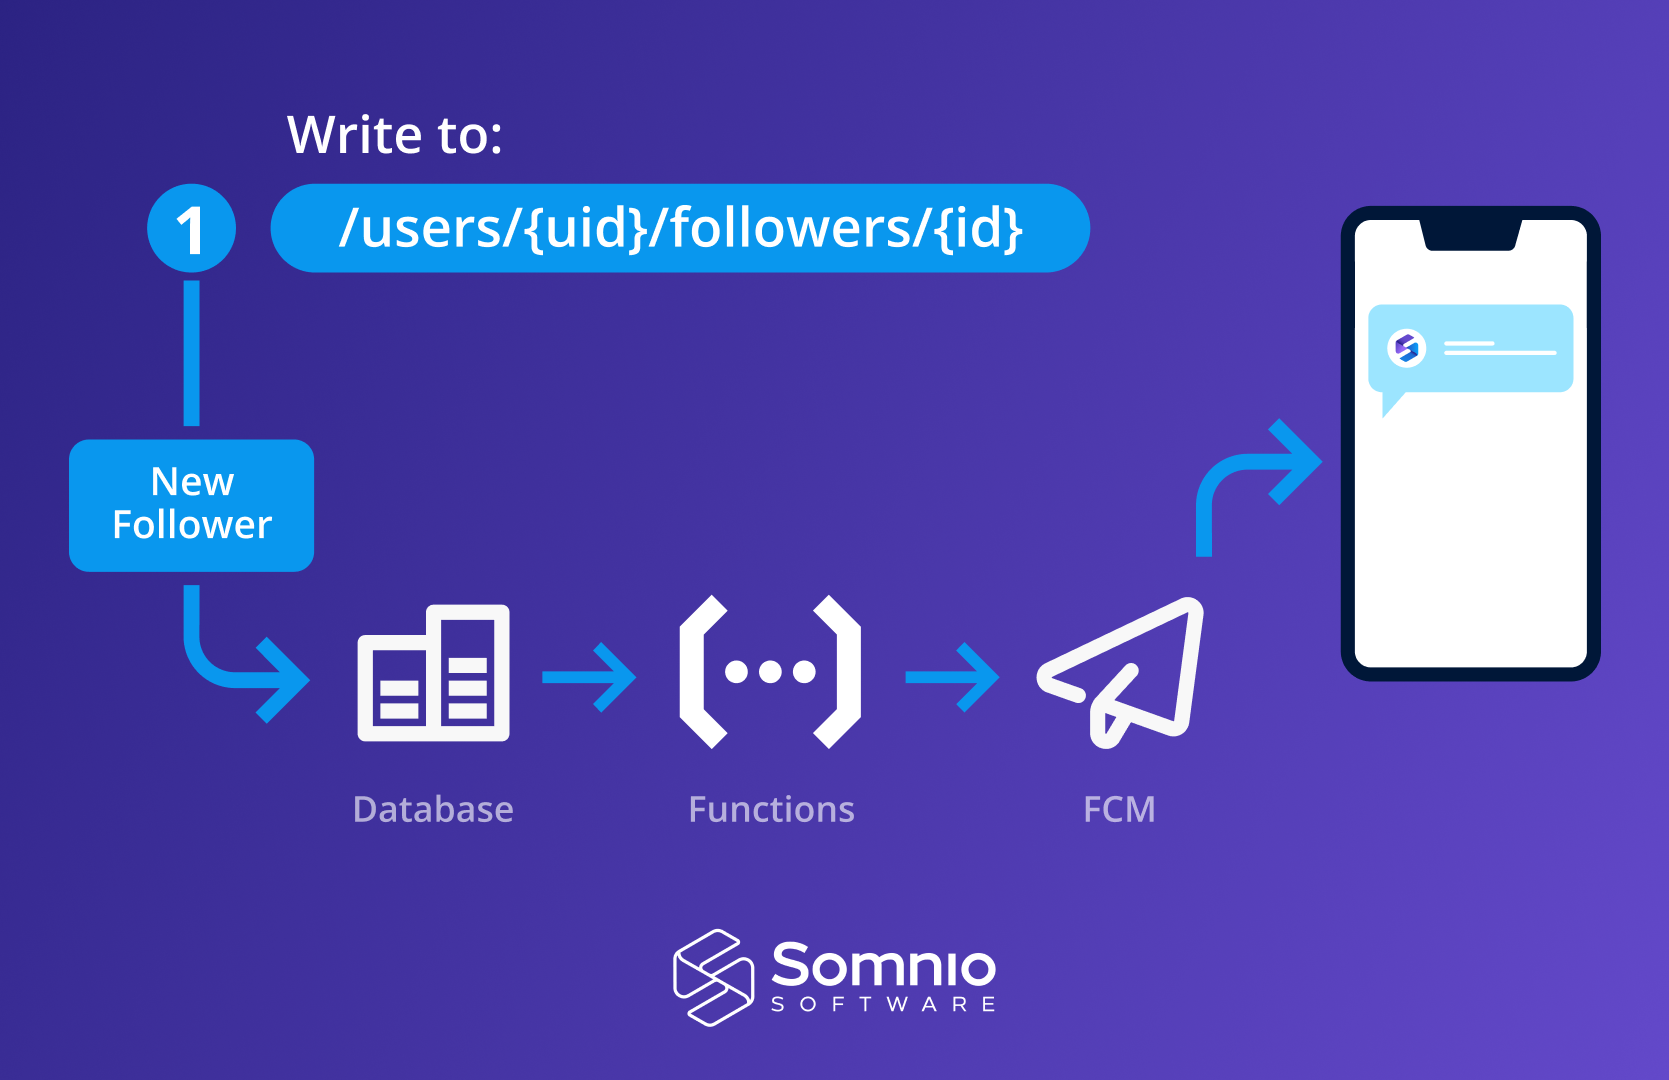
Using Topics simplifies integration with FCM since there is no need to store a list of device tokens. However, there are some considerations and limitations to keep in mind:
- Topics should not contain sensitive or private information, and they should not be created for a single user to subscribe.
- There is no limit to the number of subscriptions a topic can have.
- A device can subscribe to a maximum of 2000 topics.
- The frequency of subscriptions is limited by project.
- A server integration can send messages to up to five topics at once.
Now that we know about these limitations, let's make some changes to our app to support topics. At the application level, we can manage different topics with a simple enum, such as "weather."
Then, if we want to subscribe to certain topic, we can use FirebaseMessaging method subscribeToTopic and passed the name of the topic as a parameter:
In case we do not want to receive more messages from a certain topic, we can also unsubscribe from it using unsubscribeFromTopic method:
The main concern: too many notifications
As Flutter app developers, we are often concerned about sending too many notifications to users, which can lead to them feeling overwhelmed and annoyed. However, using topics can be a powerful way to target your audience and avoid sending spammy notifications.
By allowing users to subscribe to specific topics, FCM takes care of managing which users are subscribed to which topic and fanning out messages to them. This means that users only receive notifications that are relevant to their interests, making the overall user experience much more positive.
For example, if you have a news app, instead of sending every breaking news alert to all users, you can create topics for different categories such as sports, politics, or entertainment. Users can then choose to subscribe to the topics that interest them most, and only receive notifications for those topics.
Using topics not only reduces the risk of spamming users, but also helps to increase engagement and retention, as users are more likely to continue using your app if they are receiving notifications that are relevant to their interests.
Taking your project to production
While this project is working in our development environment, we must do some extra steps if we want to support PNs in a production environment.
Let's see how this process is for iOS:
The most important step here is the registration of a Key. This allows FCM to have full access over APNs (Apple Push Notification service).
To create a Key we must go to the Apple Developer Portal and in the 'Keys' section we have to create a new Key and select APNs.
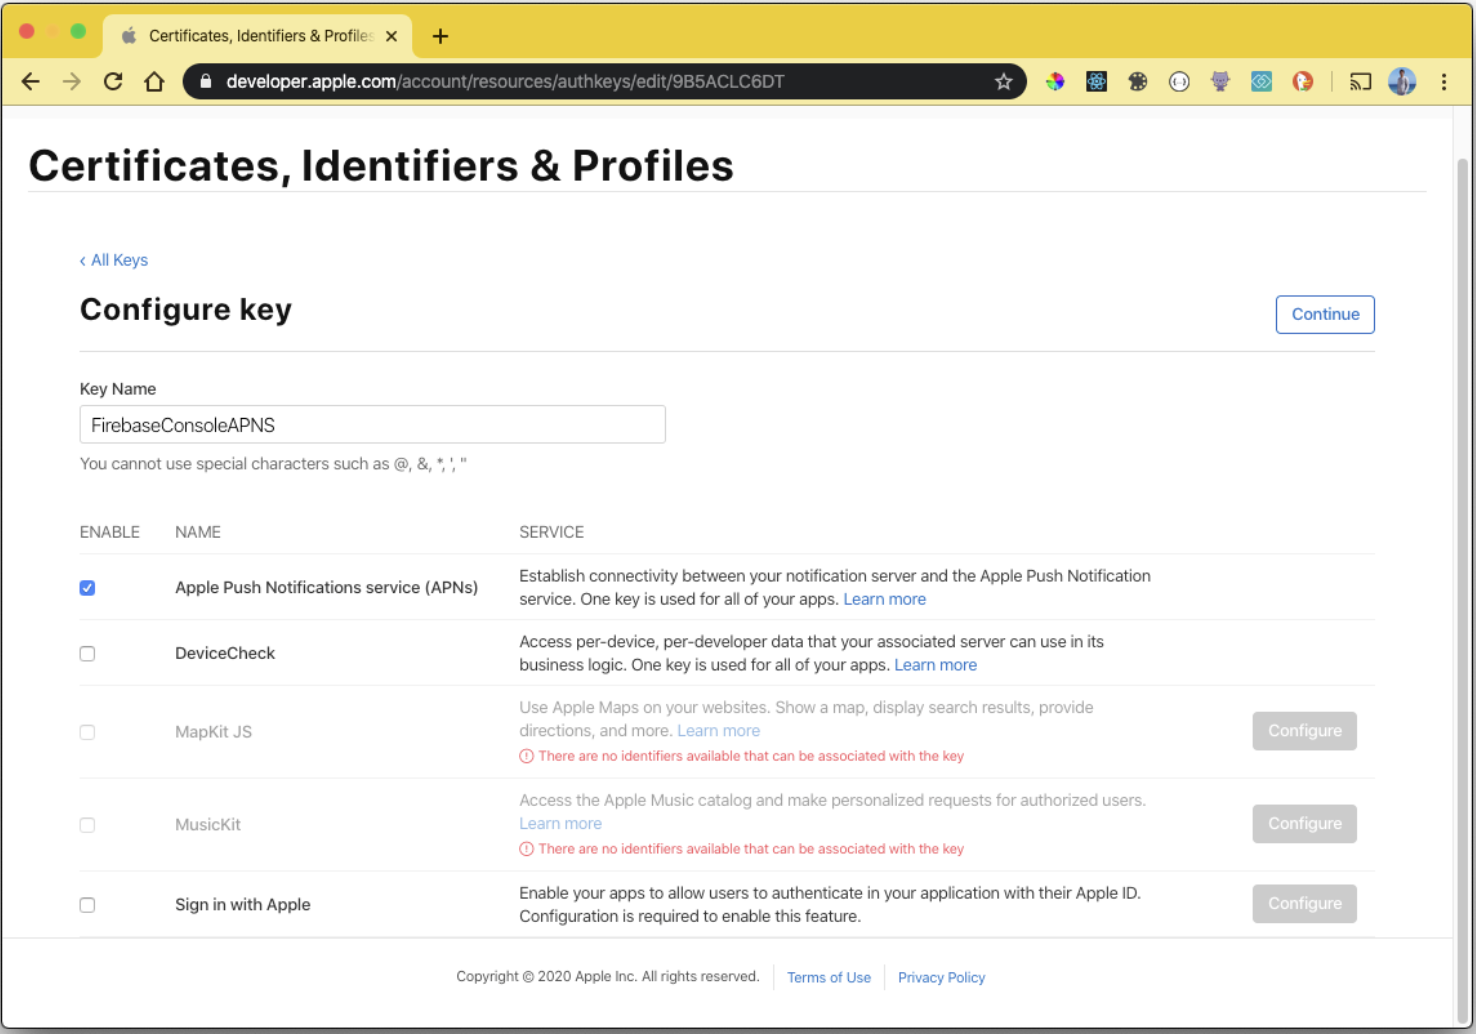
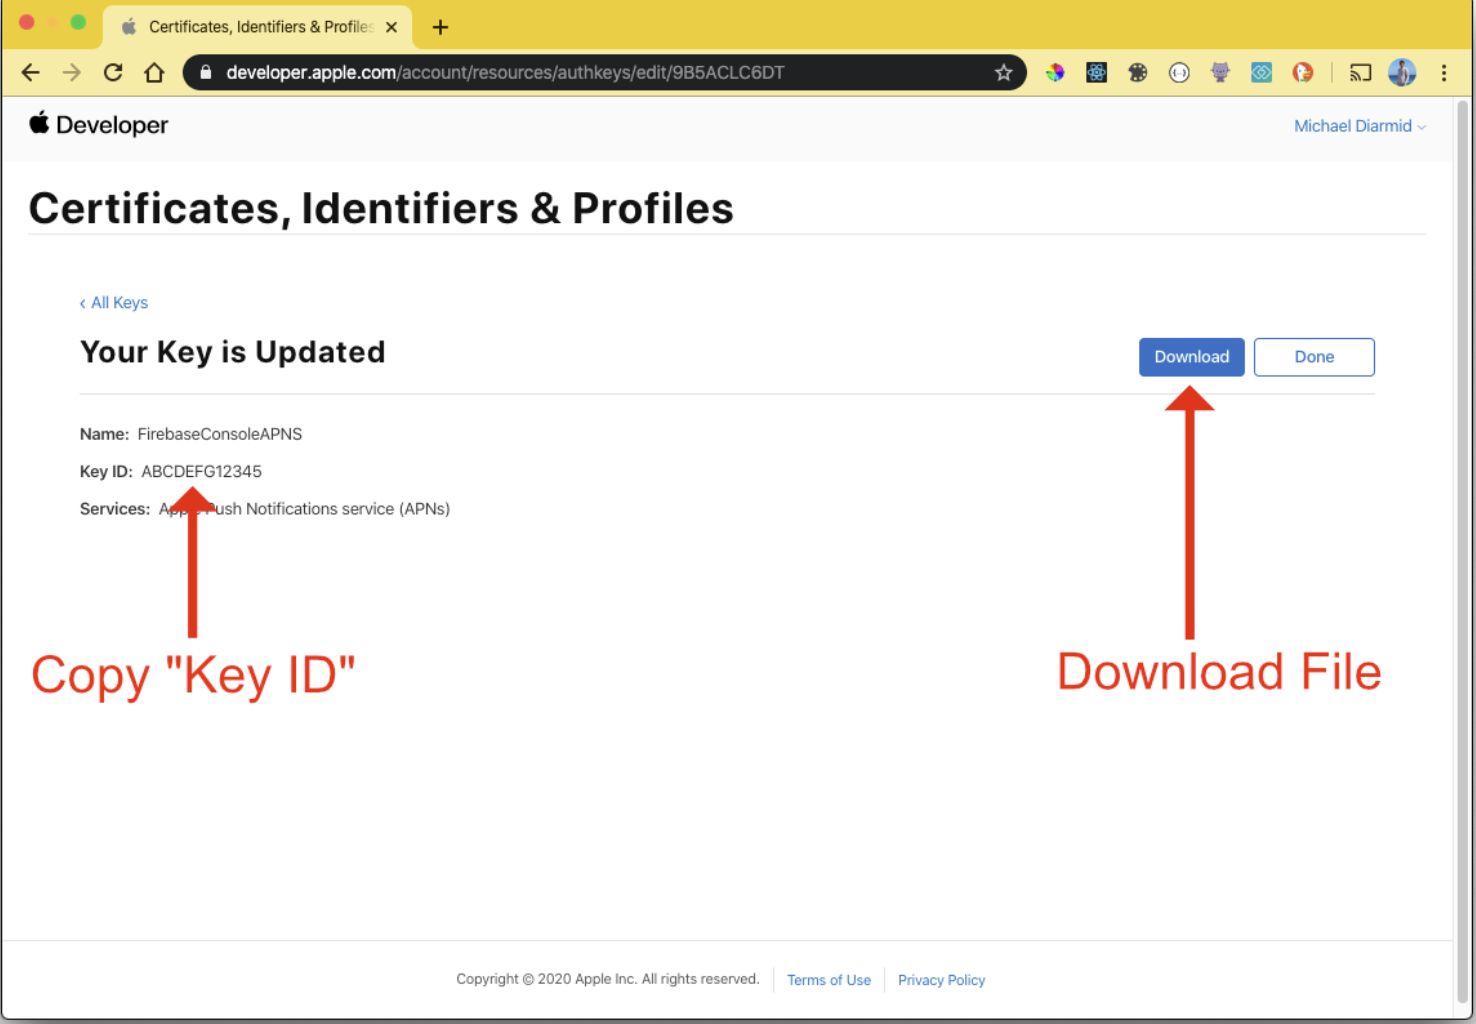
Once you have finished configuring your API key for FCM, you can select "Continue" and then "Save" to generate the key. It is essential to take note of the Key ID, which is a unique identifier for the API key that you have just created. You should also download the file containing the key and save it in a secure location, as this file is required for authentication when making requests to the FCM API.
After generating the API key for FCM, the next step is to configure your Firebase project to use it. To do this for an iOS application, you must go to the Firebase console for your project and select "Project Settings”. Then, navigate to the "Cloud Messaging" tab and select the iOS application that you want to configure, and upload the Key file along with the Team ID.
Once you have completed these steps, your app should be able to receive push notifications in a production environment.
For Android, you do not need to perform any additional steps as FCM is integrated into the Android platform by default.
Bonus: Flutter Local Notifications
Flutter Local Notifications is a plugin that allows developers to display notifications locally within their Flutter app. The main functionality of this plugin is to allow users to schedule notifications as reminders, which can be a useful feature in many types of apps.
While Flutter Local Notifications does not support the web, it does support FCM. This means that you can use the plugin to display notifications in response to incoming push notifications from FCM, allowing you to provide a consistent user experience across different platforms.
Here, you can find a guide on how to configure this plugin on Android and iOS. The package that allows you to do this is flutter_local_notifications, which is supported by FCM.
Conclusions
In my experience, integrating push notifications for the first time can be a challenging process, often accompanied by various problems and doubts. It's not uncommon to make mistakes in configuration or misunderstand the different states of a device when a notification arrives. It's also easy to overlook the importance of treating development and production environments separately. However, it's important to remember that encountering these obstacles is perfectly normal.
To overcome these challenges, my suggestion is to exercise patience and approach each step carefully. Take the time to understand each concept and ensure that everything is in place before moving on to the next step. With persistence and attention to detail, it's possible to get everything working smoothly.
I hope you can find this information useful, and hopefully you expanded your knowledge or learned something new. Let me know your thoughts and if we should add more things to the push notifications project!
Happy coding!


.png)


.png)
.png)